Here are a few tips for those instructors who wish to use audio broadcast during their Real Time Sessions. Whether you are planning to use the audio broadcast as your main instructional modality or just to supplement your prepared text presentation, these tips will help.
Your course facilitator will work with you to configure your computer and Unity audio settings for the Real Time Session.
Content
Configuration Reminders
- Connectivity. Internet connectivity is key to producing consistent sound quality. While the Unity software is fairly tolerant of a slow or sometimes intermittent connection, audio works best with a consistent high speed connection. Avoid using audio broadcast with a wireless or dial-up connection.
- Headset vs. microphone and speakers. Experience has shown that a headset is the best device for audio broadcast. Use of a microphone and speakers can cause unpleasant feedback. Please speak with your course facilitator if you need a headset.
- Audio Check. Your course facilitator will meet with you sometime before the first Real Time Session date to check that you are properly setup for the audio broadcast. Please use the same computer and internet connection for the audio check that you plan to use during the Real Time Session(s).
 Back to top
Before Every Real Time Session
- If not already done, please install your microphone headset on your computer and make it the default audio recording and default audio playback devices.
Instructions are provided in Audio Conference - Microphone Configuration.
- Make sure your audio is not muted and the headset volume is set sufficiently loud.
Try listening to music or some other audio recording outside of the Unity classroom to verify that the headset is the default audio device, that it isn't muted, and that it's volume is sufficiently loud.
- Headsets - Volume and Mute Controls
There are 3 different styles of microphone headsets provided by VIN.
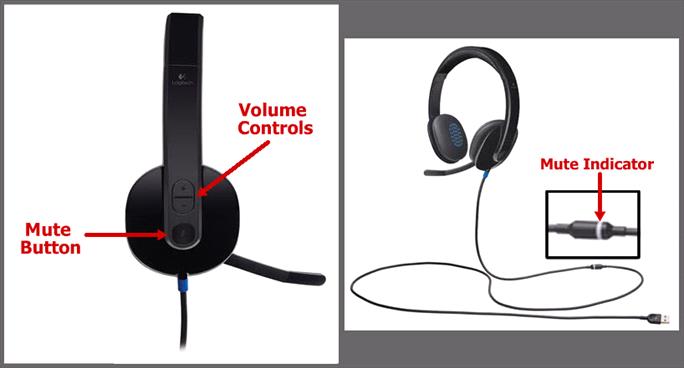
- With version 1, the mute button is located on the right ear piece and is the center of the ear piece. The volume controls are on the upper and lower rim of the right ear piece. The mute indicator is a red light located on the microphone stalk and will be lit when the microphone is muted. See below:

- With version 2, the mute button is located on the right earpiece. Above the mute button are volume up and down buttons. The mute indicator is a ring on the headset cord. It is red when the microphone is muted. See below:
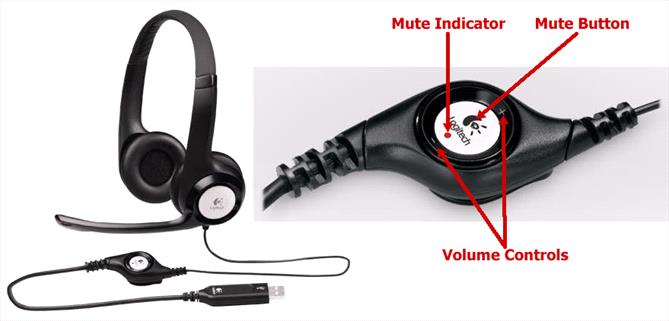
- With version 3, The mute button is located on the headset cord. It is the large silver button. The mute indicator is located on the mute button. The mute indicator blinks when muted and is solid red when not muted.
- Login and find the Unity classroom.
- Check the Unity Sound settings. On the Unity navigation bar, select OPTIONS > SETTINGS. Make sure the Mute - All sounds and Broadcast options are not checked.

- Check the Flash Player Volume
- Right click on the blue background of the Unity window and select "Settings..." to bring up the Adobe Flash Player Settings pop-up window.

- Select the Allow radio button so that Unity has permission to receive input from your headset microphone. If you select the Remember checkbox, then this setting will be remembered on your browser and computer.

- Click on the microphone icon, the fourth icon from the left located at the bottom of the Adobe Flash Player Settings pop-up window (see the red arrow). If you are using Chrome and do not see any microphone devices listed, please follow the instructions for Chrome - Allow Microphone.

- Make sure the Reduce echo checkbox is checked.
- Talk into your headset microphone and watch the volume indicator.
Adjust the Record Volume setting so the volume indicator dips into the yellow spectrum when you speak in a normal tone of voice (see the area enclosed in the red box).

- Select the Close button.
- Join the Audio Conference
To broadcast to a Unity classroom, you must first join an Audio Conference. The audio broadcast occurs when a member of the Audio Conference selects the SPEAK TO CLASS button. Then everything they say is broadcast to every person in the Unity classroom whose computer is configured to receive sound.
To join the Audio Conference:
- Select AUDIO CONFERENCE from the ADMIN TOOLS menu.
- Select the headset device (e.g. USB Logitech headset) from the list of audio devices.
- Please note, if you are using a Chrome browser and the list of audio devices is blank, please follow the instructions in Chrome - Allow Microphone.
- Select the Logitech USB microphone headset device so that it is checked.
- Select the Allow button.
- Adjust your Audio Conference Settings.

- Within the Unity Audio Conference window, check that the MUTE MIC button has not been selected. If the button shows UNMUTE, select it so that it returns to the MUTE MIC state.
- Make sure your Audio Conference Gain is set high enough that when you speak in a normal tone of voice, the Level indicator stays mostly black. Start with the Gain set to 3/4 full and adjust as necessary.
- The Speaker Volume setting should be set high enough you can easily hear the other people on the Audio Conference. Start with the Speaker Volume set to 3/4 full.
- Open the Advanced Features pane by clicking on the bar at the bottom of the Audio Conference window (indicated by the red arrow in the previous image). Set the Sidetone to zero (0) bars.

For more information on how to use the Unity Audio Conference, see: Audio Conference.
- Test the Audio Conference Broadcast.
- Ask one of the moderators to listen from outside the Audio Conference while you speak to the class.
- Select the SPEAK TO CLASS button in the Audio Conference window and wait until you see a green text message (e.g. "Peggy Hall will be speaking to the class shortly.") appear in the Conference Room.
- Say a few words; a greeting to the session participants should suffice.
- Select the GO OFF THE AIR button. The button will change to display FINISHING UP and then will revert to the Speak to Class button. A green text message (e.g. "Peggy Hall has stopped speaking to the class.) will be sent to the Conference Room indicating you are no longer speaking to the class.
Back to top
General Tips
- Come to every Real Time Session at least 15 minutes before the session starts so the moderators have a time to troubleshoot if there is a problem with your audio.
- Make sure your headset is positioned properly and the headset microphone is close to your mouth.
- Speak in a loud, clear voice.
- Make sure to clearly enunciate your words.
- If you have a long period of uninterrupted audio (lecture), we recommend you take a short break every 10 to 20 minutes. Go off the air, wait for 2 seconds, and then speak to class again. If you have interspersed your presentation with poll questions, going off the air while a poll is active usually takes care of this requirement.
Back to top
Slides
- Sending slides to the class.
- To start, use the Presenter SEND button to send the first slide.
Thereafter, use the ADV button to advance to the next contiguous slide and send it to the class. If the ADV button ever becomes inactive, you can use the SEND button to send the current slide and reactivate the ADV button.
- Once the link for the slide appears in the Unity Conference Room, state the number or title of the slide before proceeding with your lecture.
- Presenter Arrows
- If you plan to use the Presenter arrows extensively during the real-time session, please warn the course facilitator at least a week prior to the session so he/she can prepare.
- Arrows can be added to the images in your slideshow ahead of time. Talk with your course facilitator to set this up. Please give the VIN staff at least a weeks advance notice. The arrows should be numbered or lettered so you can indicate orally which arrow you are talking about e.g., "Arrow 'c' is indicating the puppies left ear and arrow 'b' is pointing at the puppies tail." Talk with your course facilitator to get this set up.
- If you choose to use one of the 3 presenter arrows to indicate a particular point on the slide, please state which arrow you are using, e.g., "The green arrow is pointing at the puppies left ear."
- We recommend that you not use the same arrow twice for the same slide e.g., using the green arrow to point out the puppies left ear and then moving that same green arrow to point out the puppies tail. Instead, use the green arrow to point out the puppies left ear and use another arrow, say the white arrow, to point out the puppies tail.
- Slide Look Ahead
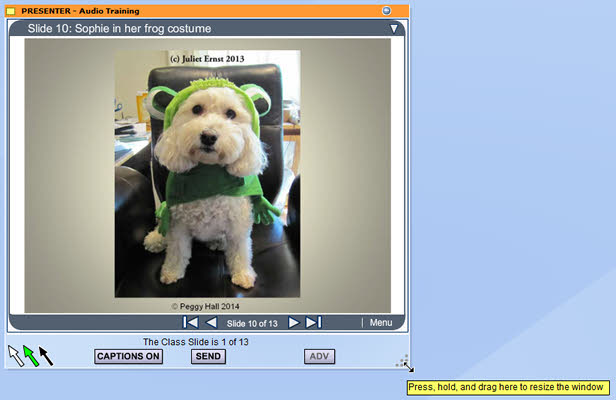
- Place your cursor over the triangle of grey dots on the bottom right of the Presenter window and drag it to the right approximately one inch before you release the mouse button. This will make the Presenter window about 1" wider.
- Select Filmstrip Sidebar from the Presenter Menu.
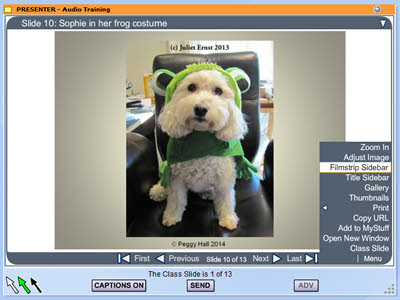
- The slides will display like a filmstrip on the left side of the Presenter window.
Use the filmstrip sidebar to "look ahead" at the slides that are coming up.
Back to top
Polls
- If you request it ahead of time, the course facilitator can send you a text file containing all the polls for your Real Time Session along with the correct poll answer (if the poll HAS a correct answer). You can print these out and have them on hand during the Real Time Session.
- When a poll slide is encountered, read the poll question aloud to the class so it gets incorporated into the audio recording of the Real Time Session. Then go off the air to avoid interrupting the class during the poll. This is also a nice way to automatically provide breaks in long stretches of audio.
- While a poll is running, we recommend that you don't send text into the Conference Room or perform any other action that will distract the participants while they are trying to answer the poll.
- Once the poll completes, the poll results will display in the Conference Room window. Activate the Audio Conference - Speak to Class. If the poll has a correct (or best) answer, state the answer explicitly after the poll results are displayed. Participants appreciate positive feedback when the majority of them have chosen the correct answer. For survey-type polls, remembering to include a comment that the results are expected, surprising, interesting, thought-provoking, etc., to further improve the interactive nature of polls. Then continue with your audio lecture.
For more information about polls, see Polling Management.
Back to top
Question Screener
When answering a question orally:
- If not already broadcasting, activate the Audio Conference - Speak to Class.
- Select a question from the list of questions in Question Screener.
- Send the question into the Conference Room.
- State the name of the person asking the question.
- Read the question aloud to the class.
- State your answer to the question.
Questionable Questions
- Comments can be deleted, ignored, or sent directly into the Conference Room without adding an answer.
- Delete questions or comments that are argumentative, off topic, or strictly social in nature.
- Delete questions that will be answered later in the lecture.
- Delete duplicate questions or comments.
- Respond to questions that require research or an extensive answer by requesting that the participant post the question to the course message boards.
- Advise participants if the question will be covered in a later Real Time Session.
- Questions of the form "?" or "!" should be left in the Question Screener for the moderator to handle. They will remove the question once the participant has been contacted.
- Any requests for technical assistance or help with CE issues should be left in the Question Screener for the moderators to handle. They'll remove the question/comment once the person requesting help has been contacted.
- If there is a question that needs clarification, ask one of your moderators (using All Staff) to have the participant clarify and restate the question. Leave the question in Question Screener for the moderator to update.
At the end of the Real Time Session, unanswered questions will be sent to the instructor within 24 hours by the facilitator. The instructor can then address these questions on the message boards.
When to Send Q&A into Conference Room
Send the questions and answers into the Conference Room when:
- There is an appropriate break in the presentation.
- After a poll has completed. Please do not send questions into the Conference Room while a poll is running.
- When sending questions that have text answers (usually answered by a second instructor while the first one is broadcasting the lecture), please allow sufficient time for the participants to read both the question and answer text uninterrupted.
Coordination Among Instructors
With multiple instructors, the decision about which questions each instructor will answer should be coordinated in All Staff or within the Audio Conference.
If one instructor has a question or comment for a co-instructor and does not want to share it with the rest of the class, he/she should use All Staff. Anything sent to the Conference Room by an Admin-level (staff, moderator, instructor) user will NOT be redirected to Question Screener. It will be displayed directly into the Conference Room, even when the room is moderated.
Typically a co-instructor will answer questions while the lead instructor handles presenting the class material. The lead instructor will coordinate with the co-instructor in All Staff or Audio Conference when an appropriate time has come to transmit questions. The lead instructor will review the answers, add to them where appropriate, and send them into the Conference Room.
Having a single person (the lead instructor) responsible for sending the question answers prevents inappropriate interruptions of the presentation.
Class Credit
All subject-related questions that are entered into the Question Screener log are counted as participation for statistics. Even if a question is deleted, it is still counted.
The Question Screener log is available for instructor review if there are questions that you deleted but would like to retrieve and answer on the course message boards. Moderators can extract any combination of the following categories:
- unanswered questions,
- deleted questions, and
- questions that were answered but not sent.
Advise your moderator if you wish to receive an extract of the Question Screener log.
For more information on how Question Screener works, see Question Screener.
Back to top